Guide to Scraping
Warning
This is StashDB focused guide and is no longer actively maintained. For the most up-to-date information on scraping scenes via stash-box endpoints, please see Scraping scenes via stash-box.
The following is our recommended procedure for new Stash users who want to get info for their scenes as quickly, easily, and as accurately as possible. Pulling info directly from StashDB is still the best option, but unfortunately this will not always be possible. Alternative methods are also covered for when StashDB doesn't have what you need. This is an expanded version of @Scruffy's pinned post in the #stashdb-general channel in our Discord. Go there if you'd like something more succinct and direct. Hopefully this guide will reduce the pain and frustration for those who are lost and don't know where to start.
The following sections are in this particular order for a reason, so please follow this guide from the beginning.
Generate pHashes
-
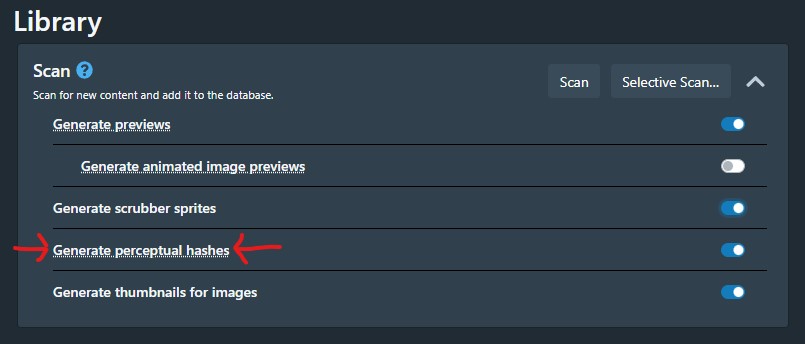
Navigate to the Settings page (⚙ icon in top right), make sure you're on "Tasks" in the sidebar to the left, then find the first heading "Library" in the middle of the page. Make sure "Generate perceptual hashes" is turned on so pHashes will be created automatically each time you run a scan to add new scenes. This will slow down the scanning process, but for most users it's worth it. pHashes are the main way to match your scenes with our data on StashDB.
-
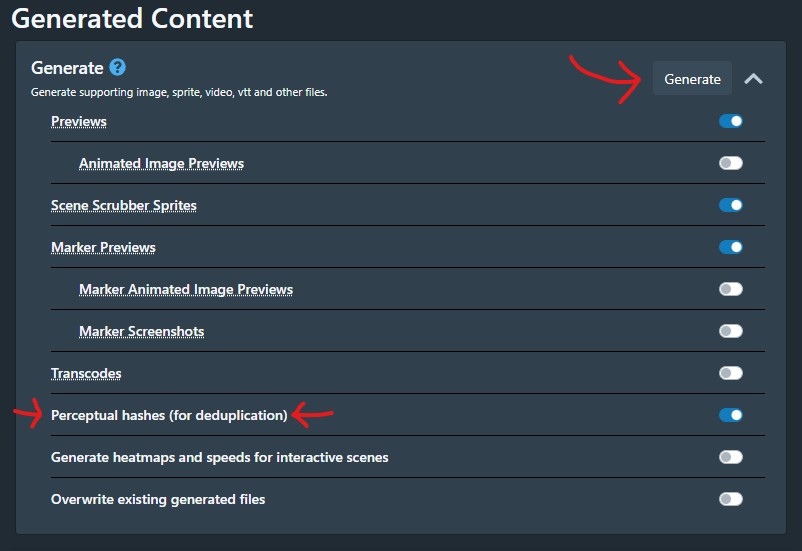
pHash generation is not turned on by default, so you'll need to generate them manually if you haven't already. This can be done on your entire library on the same Settings --> Tasks page, scroll down to the "Generated Content" heading. Make sure "Perceptual hashes (for deduplication)" is turned on and click the "Generate" button at the top. As long as "Overwrite existing generated files" is turned off, this will only generate missing files and hashes.
Join StashDB
If you haven't set up StashDB in your Stash settings yet, now's the time to do it. The best way to do that is to follow this guide to Accessing StashDB. It includes step-by-step instructions for both signing up to StashDB and connecting your new account to Stash.
Use the Scene Tagger
-
Go to your Scenes page on Stash and click the double 🔖 icon to the far right of the search bar. This is your Scene Tagger view and should be your first choice for pulling data, not Identify / Autotag / Filename Parser / URL Scrapers / etc. Always use the Scene Tagger first, the rest are for users with more specific needs who understand the strengths and weaknesses of each tool.

Important
Tags are not created automatically. You need to click
+icon near the tag name to create it for you locally and attach it to the scene. Once it's created, it will match automatically in the future. -
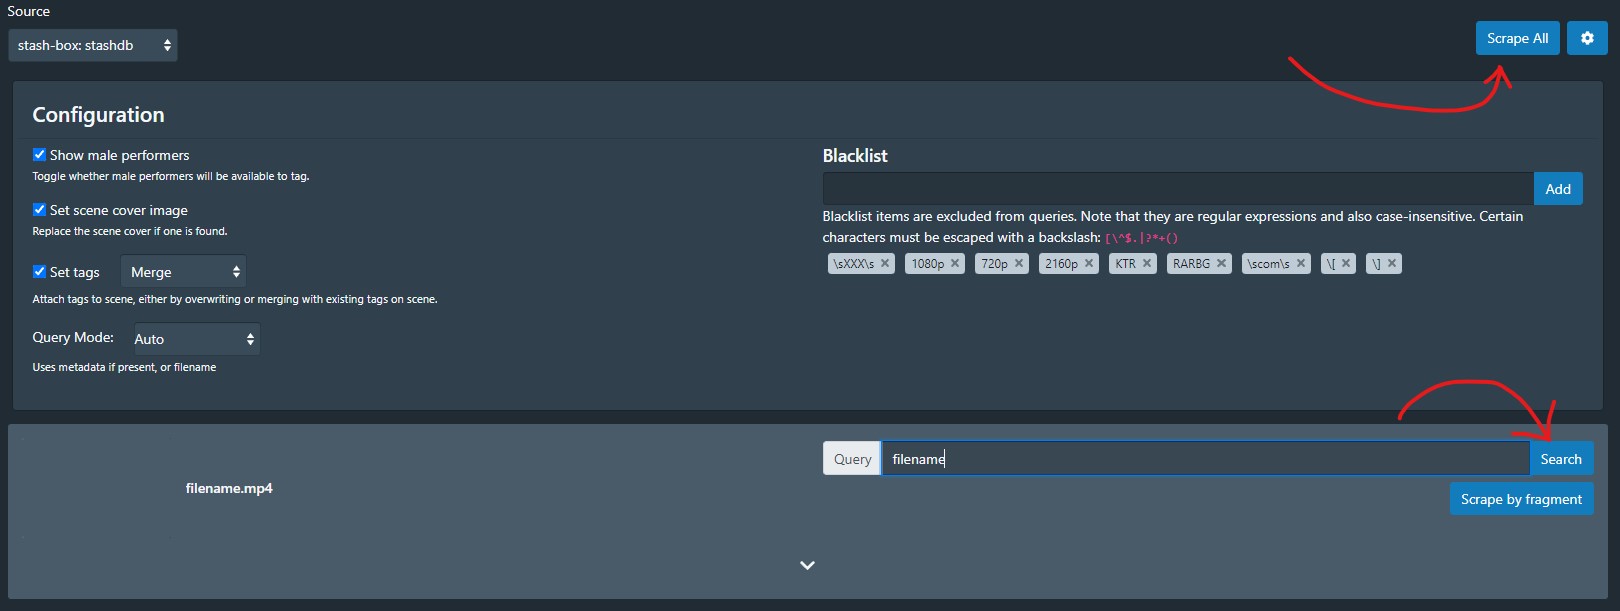
First, click the "Scrape All" button. This will use your pHashes to find matching scenes on StashDB for every scene on the current page. The "Scrape by fragment" buttons will do the same thing but just for one scene at a time. Also, you may want to change your Scene Tagger settings with the ⚙ icon next to "Scrape All." You can tell it to Merge (keep all) tags, Overwrite (keep only new) tags, or ignore StashDB's tags entirely (leave box unchecked). If you plan on contributing to StashDB, you should have "Show male performers" turned on to better follow these guidelines.
-
If your fingerprint search doesn't return a correct result for your scene, you can try searching with the "Query" field using title, performer, release date, or studio. Try to use as little text as possible to find your scene. Otherwise, unnecessary words that do not match StashDB's info may block correct results. If you can find the matching scene on StashDB.org but can't find it using the Scene Tagger, you can use the scene's StashID as your Tagger query.

-
Be sure to double-check that each selected result matches your scene before clicking the "Save" button at the bottom of each card. If you're confident that all of your saved matches are accurate, you may click the "Submit fingerprints" button after you're done. This will add your files' hashes to StashDB to make them easier for other users to find. But again, make sure your files were matched correctly first. The button will appear right next to the "Scrape All" button.
Use ThePornDB Endpoint
-
If you are absolutely sure a scene isn't on StashDB anywhere, the next easiest method is to try ThePornDB. They have significantly more scenes than StashDB thanks to their automated scrapers, but their info isn't always as complete or accurate compared to StashDB's manually curated approach. They also don't have as many pHashes so matching scenes can be trickier as well. By using their Endpoint and submitting fingerprints to them when you have a good match via searching, you make life easier for everyone else scraping there.
-
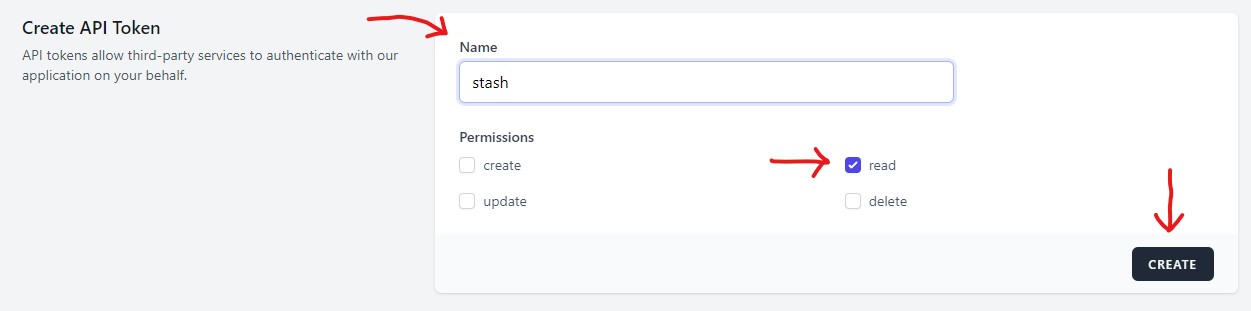
First step is to make an account at theporndb.net. With your account created, navigate to your API Tokens page. Type "stash" as your token's name (or whatever you'd prefer), make sure the "read" permission is checked (you don't need the others), and click the "Create" button. A pop-up will display your newly created token. Save your API token somewhere so you can find it later!. It will not be visible on ThePornDB's website after you close the pop-up. If you lose it, you may need to create a new one and repeat this entire setup process. This can be done in a password manager, notes app, or a well-placed text file.
-
Go to the Settings page in Stash (http://localhost:9999/settings by default), click Metadata Providers on the left side and find Stash-box Endpoints at the top.
-
Click Add and fill out the form that pops up: paste in your API key you created earlier amd enter
ThePornDB(or anything else you'd like, like TPDB) for Name, and enterhttps://theporndb.net/graphqlas the GraphQL endpoint. -
Click Test Credentials to make sure you've entered everything correctly, then click Confirm.
-
Finally, we can use the Scene Tagger to scrape from ThePornDB. First you'll need to switch to "ThePornDB" as the Tagger's source. It will always default to the first Stash-Box source, so you'll need to switch it every time you need something else. Use the same process here as we used with StashDB and the Scene Tagger. The "Scrape All" and "Scrape by fragment" buttons will match by using file hashes (pHash and oshash). If these don't give you the right results, you can try the "Search" button and customize your search terms as needed. Remember to use as few terms as possible in your search because unneccessary words that don't match ThePornDB's info may block correct results. You can also copy-paste additional terms from TPDB's page if you need to narrow down the Tagger's results more.
For those wanting to contribute to StashDB
As noted before, ThePornDB leans heavily on automated scrapers to pull all of their info. Often that data is incomplete or inaccurate compared to what we'd want on StashDB. Before you submit your scene to StashDB, you'll need to double-check your info, clean it up a bit first, and make sure you're following these guidelines. Submitting to StashDB is discussed further in the last step of this guide.
Use Site-Specific Scrapers
-
If you've already tried StashDB, you've already tried ThePornDB, and you still want to scrape a site directly, you can try using a site-specific scraper. However, every scraper is going to work differently. Some will need Python installed. Others will need you to set a user agent or a Chrome CDP path. A handful will need to be edited and configured first. Only a few can search a studio's website for the right scene. The entire process is much more advanced and is different for each scraper, which is why we recommend StashDB and TPDB first for new users. They can all be found in the same repo. You can download them individually, or you can download the entire repo as a zip archive.
-
First you'll want to search this page for your website to see if we have a scraper for it and to get an idea of what its requirements are. For most of these scrapers, you'll need to find and save a studio URL to your scene first. If you've managed to set up a fragment scraper, you can click on the "Scrape with..." button in the scene's edit tab to select your scraper. Typically fragment scrapers are better than URL scrapers. Otherwise, you'll need to click the button at the far right end of the URL field to run a URL scraper. It should light up when the field is filled with a URL that matches one of your installed scrapers. That's about as detailed as we can get in this guide for new users. If you've tried StashDB, tried TPDB, checked the relevant documentation, checked your logs, and still can't get one of these scrapers working, you can ask for help on Discord in the #help channel. More advanced discussions might be moved to the #scrapers channel
Submit to StashDB
-
If you're certain a scene isn't on StashDB and you've found the info using ThePornDB or some other scraper, please consider submitting it to StashDB yourself. That way nobody else will have to duplicate the same work you've done for that particular scene if they can match their pHash with yours. You'll need to ask for edit privileges in our Discord and follow the guidelines on this website. In particular, please note that not every scene can be added to StashDB at this time. Some studios aren't allowed and full movies likely won't be eligible either.
-
Also, please don't blindly resubmit data gotten from ThePornDB. You should verify the data is correct and complete first, make sure the URL is right, check for any missing performers, and look up any relevant guidelines if something else seems funky to you. You should update your data within Stash before submitting a draft or you can edit the draft on StashDB itself before creating the edit. You should also have the studio URL now, so you should also compare with that page manually or even scrape again with a site-specific scraper as explained in the previous step of this guide. Also please note in your edit comment where your data is coming from.